In this activity, participants create their own recycled paper, incorporating natural materials from around them. This allows them to experience a practical process from beginning to end and gain an understanding of recycling and papermaking processes.
The Activity
Please note, this activity requires the prior collection of materials:
- suitable papers for pulping are to be collected beforehand
- natural materials for inclusion are to be collected on a visit outdoors
Full details of preparatory requirements are given below.
Artform/Type of Activity
Papermaking
Objectives/Outcomes
- To learn about recycling and the processes used in papermaking
- To explore the decorative uses of grasses, flowers and seeds in papermaking to achieve differing textures and surfaces, and/or to represent a particular visit or site visited
- To experience a ‘hands-on’ process from start to finish
Materials Required
- Collected papers for making paper pulp – these will need to be collected prior to workshop and should be soft papers rather than hard or glazed. Newspapers, shredded office paper, sugar paper and tissue papers are the fastest/ easiest to pulp. Quantities will depend on numbers of participant papermakers, but you will need quite a lot, as it ‘mushes’ down.
- Large watertight tub to hold torn paper and water – note: this will need to be left to soak overnight – see below.
- A range of handmade papers to show as examples.
- Collected natural materials such as flowers, petals, leaves, seeds, grasses etc. to be added into the paper pulp. These are to be collected by participants prior to the papermaking workshop. Please note, sticks, pine cones and suchlike will be too chunky.
- Clear rules for collection will be:
- clear guidance to be sought from nature expert on plants that can be harmful to humans (eg Hogweed – Heracleum) or that are protected and should not be disturbed
- only pick a small part of any plant
- no living creatures
- take care around sharp objects, thorns, stinging plants etc: gloves if necessary
- Large bucket/ tub/ bowl for blending pulp.
- Stick blender (for adult use only)/ power source.
- Old pillow case for squeezing water out of paper mixture.
- Plastic waterproof trays/ tubs for papermaking – these must be big enough for the cut mesh (see below) to fit in.
- Small gauge metal mesh for collecting pulp during papermaking. This material is used for car body repairs, so can be sourced from garages or car accessory suppliers. This can be bought on a roll and cut to size (approximately A5 or A4 or to suit, but must be smaller than the cloths – see below), then edged with duct/ gaffer tape and stapled, to ensure sharp scratchy edges are safely covered. The taped edges also will act as a barrier to the pulp so that the mesh pieces can be held during papermaking.
- Sponges, thin washing up/ household cloths (the kind that come on rolls or in multi-packs)
- Lots of newspapers to protect tables and surfaces (these will be used whole, not spread out as pages, at least one per participant, so lots really are needed). Ensure newspapers are appropriate with suitable language and images.
- Plastic coverings for tables and for participants – this is a wet activity!
Space Requirements
This can be done in a classroom or workspace which allows reasonable room to move but please note, this is a wet activity.
Activity Instructions
- (Day before papermaking workshop): tear papers to be recycled into small pieces, no bigger than 3 centimetres square (this is strangely therapeutic!)
- (Day before papermaking workshop): put the torn paper into a large watertight container/ tub, and pour in plenty of hot water to cover.
- Leave overnight.
- Stir torn paper mixture to ensure even spread of colour and to break up large lumps etc. This mix should not be too dry; it should have the consistency of rough porridge.
- Put some mixture – approximately 4 pints or 2 litres – into a bowl or bucket, and blend with the stick blender until the fibres loosen and the paper fibres are suspended in the water. (Note: trying to pulp too much at a time, or having the torn paper mix too dry, will burn out the motor on the blender.) This process can be repeated until all the mix has been pulped.
- Put the blended paper pulp (amounts as above) into the old pillow case and squeeze to get rid of excess water. The pulp is now ready to be used – if the pulp is not going to be used for a day or two then it can be frozen in a doubled freezer bag until needed.
- Artist/ Teacher/ Leader shows samples of hand-made paper as examples of the ‘end product’; discuss different textures etc
- Divide the participants into small groups. Each group can decide what they are going to add to their paper mix from the collected natural materials – eg they could add a general mix of petals, seeds, and grasses, or a particular group could put just petals or just grasses and so on. It is good to have a range of choices and to compare the range of end results, and you might want to make some plain sheets, with no additions to the pulp, for comparison.
- Set each group around a tray/ tub (big enough for the mesh pieces) half full of warm water in the middle of their table; each participant to have a pad of newspaper to work on top of, which will act like a sponge to collect excess water – at least a whole newspaper each. Each participant is given their piece of the cut and edged mesh.
- Put a couple of handfuls of the pulp in to the tray/ tub and swirl it round gently, to spread the pulp through the water consistently. Add the natural materials and swirl gently again, mixing them evenly through.
- Using the mesh pieces: A/T/L to demonstrate first –
- Only one person at a time to use the pulp
- Put one hand in the tray/ tub and swirl gently again
- Holding the mesh horizontally, tilt it as it enters the water to a 45˚ angle, until it is wholly (or nearly) submerged; then, in one motion, bring the mesh up slowly out of the pulp mixture, slightly moving it from side to side until it is wholly raised out of the water
- There should be a good layer of pulp on top of the mesh sheet; if not, scrape the pulp back in and try again
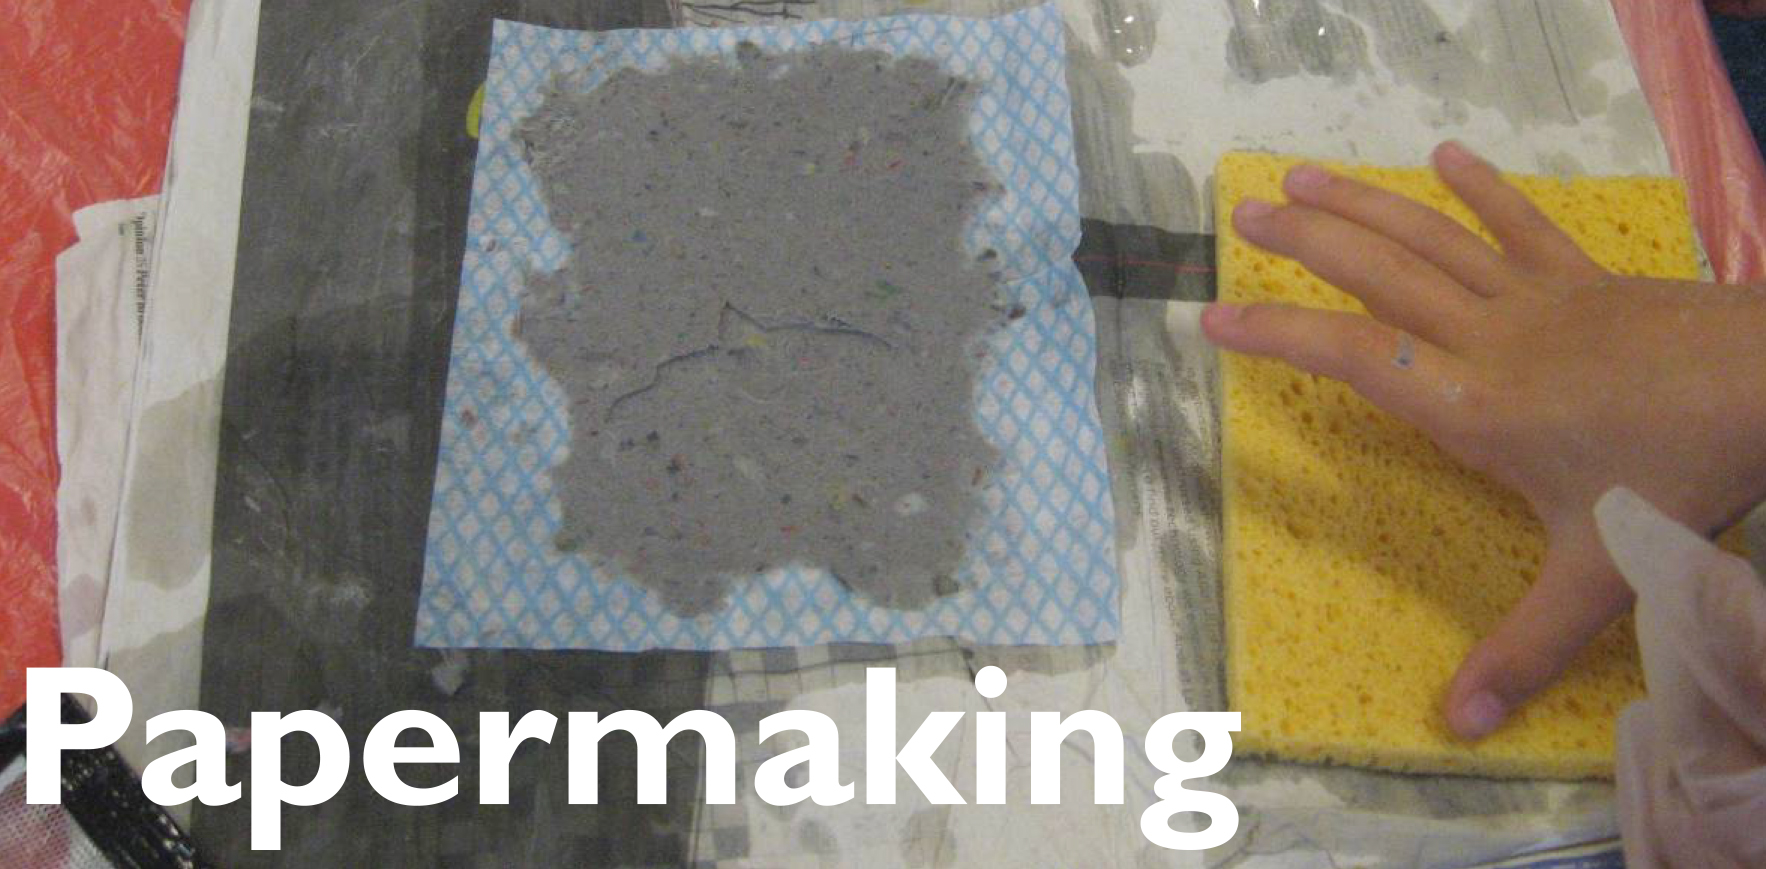
- Once a layer of pulp is collected on the mesh put a sponge underneath the mesh to soak up any excess water, and then quickly turn the pulp (still on the mesh) over onto a washing up/ household cloth, on top of the newspaper pad. Squeeze the sponge out then press over the top of the mesh to soak up more water.
- Gently remove mesh, leaving pressed pulp in a sheet on the cloth
- Leave the sheet of pulp to dry on the cloth; once dry it should peel off as a complete sheet.
- Trays/ tubs will need topping up with water and pulp depending on how many people are papermaking. Participants can try different mixes. Cloths can have names written on at the edge to identify paper sheets once they are dry.
Curricular Links
Links to Art and Design through: exploring and developing ideas; investigating and making; evaluating and developing work
Links to Design and Technology through: develop, plan and communicate ideas; work with tools, equipment and materials
This resource was designed as part of the Green TV project.
PDF Work Sheet
See our A to Z of creative activity resources here.
Funded By
The creation of this resource was made possible by funding from the Heritage Lottery Fund.
